- Khóa Nhận Dạng Khuôn Mặt Tenon FI
- Mã sản phẩm: Tenon FI
- Giá: Liên hệ
- Số lượng:
- Lượt xem: 3664
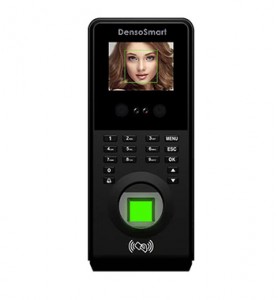
- ✢ Kiểu mở: Nhận dạng khuôn mặt (FaceID), Vân tay, mã số và thẻ cảm ứng ✢ Chức năng: kiểm soát cửa ra vào kết hợp chấm công ✢ Bảo hành: 12 Tháng
- Đặt mua sản phẩm
- Chia sẻ:
- Thông tin sản phẩm
Tham Khảo Hình ảnh lắp đặt thực tế: Tại đây
Ưu điểm Hệ Thống Kiểm Soát Cửa Ra Vào Nhận Dạng Khuôn Mặt Kết Hợp Vân Tay, Thẻ Từ, Mã Số Tenon FI
Giải pháp kiểm soát cửa ra vào cho căn hộ dịch vụ/ nhà trọ/văn phòng/xí nghiệp bằng Nhận dạng khuôn mặt (Face ID), Vân tay, mã số và thẻ cảm ứng hoặc kết hợp với các hình thức xác nhận giúp cho việc truy cập được đảm bảo tốt hơn. Mắt đọc cảm biến quang học: Optical.
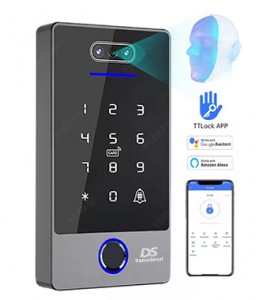
Access control nhận diện khuôn mặt là một trong những sản phẩm mới nhất về ứng dụng công nghệ nhận dạng khuôn mặt 3D trên khóa cửa. Hệ thống nhận dạng khuôn mặt sửa dụng camera kép: 1 camera thường và 1 camera hồng ngoại quét toàn bộ các đặc điểm trên khuôn mặt để tạo hình ảnh 3D.
Khóa nhận dạng khuôn mặt Tenon FI cho phép cài đặt giờ ra vào theo thời gian quy định. Kiểm tra lịch sử ra vào của từng user. Với dung lượng lưu trữ lớn: Vân tay: 3000, Face ID: 500, Mã số: 1.000, Thẻ từ: 1000, Attend Rec: 100.000, Manage Rec: 1.000 là sự lựa chọn hoàn hảo cho căn hộ dịch vụ, văn phòng, xí nghiệp.

Với công nghệ 3D, các điểm nhận dạng trên khuôn mặt sẽ được quét cùng với khoảng cách 3 chiều với các điểm nhận dạng xung quanh để tạo nên nhận dạng 3D khuôn mặt của người sử dụng. Camera hồng ngoại quét các điểm lồi lõm trên khuôn mặt khi nhận dạng để so sánh với khuôn mặt 3D đã được đăng ký để tiến hành nhận dạng. Với nguyên lý hoạt động này, các hình ảnh của người sử dụng bằng thiết bị di động, bằng ảnh chụp sẽ bị từ chối khi nhận dạng, đồng nghĩa với việc không thể đánh lừa
Đặc biệt hệ thống camera kép cho phép nhận diện ngay trời tối, thiếu ánh sáng. Chức năng: kiểm soát cửa ra vào qua việc nhận diện khuôn mặt của từng thành viên hoặc mở khoá bằng vân tay, thẻ từ và mã số
Cho phép kết các loại khóa thẻ chốt, khóa điện tử, nam châm điện, cửa kính trượt tự động ... có thể sử dụng đa dạng cho mọi loại cửa.

Khoảng cách tốt nhất là 0,5m cho người dùng và máy (Chiều cao người dùng phạm vi 1,55m-1,85m). Nếu hình ảnh khuôn mặt quá tối hoặc sáng, người dùng có thể di chuyển trở lại hoặc phía trước để điều chỉnh
Hướng dẫn sử dụng Khóa Nhận Dạng Khuôn Mặt FaceID (User Guide)
Keypad:

Keypad 0 – 9 Input number, alphabet or select menu options
“0”= space
ESC Exit
MENU Enter Menu Status
OK Enter (Confirm)
▲ Cursor Upward
▼ Cursor Downward
![]() After link a external doorbell indoor, user can press this button. when he need to enter the door, then the doorbell indoor will ring. When need to input user name, press bell key to change input methord.
After link a external doorbell indoor, user can press this button. when he need to enter the door, then the doorbell indoor will ring. When need to input user name, press bell key to change input methord.
User Managerment
Enroll ,add or delete user information ,face, fingerprint, card and password.
1.1 Enroll User
In this section user can add new user

Index:
A 【ID】
Step:Enter menu(Press“MENU”)→【Employee】→【Register】→【ID】 Input the users’ ID, the ID should be within 1-99999999
B【Name】
Press▼ to【Name】, use Bell key to change input methord, and MENU key is delete.
ESC key is to exit.
C【Department】
Press▼ to【Dept】, choose the employees’ department,user need to set department before enroll(Step: 【MENU】→【Att.Rule】→【2.Set Dept】), if don’t choose department, then will be in dept 1
D【Face】
Press▼ to【4. Face】

When collect face, please put your face in the middle of the screen, the camera will collect the face image automatically after it detected face. When the progress bar at the bottom of the screen is completely over, the screen will prompt to automatically return to the information input interface of the current person after successful registration.(If no need next step, then press “ESC”to back)
E【Finger】
Press▼ to【4. Finger】

One finger need press 3 times, after collet successful, the screen will prompt to automatically return to the information input interface of the current person after successful registration. (If no need next step, then press “ESC”to back)
F【Password】
Press▼ to【Password】

When the screen prompts user input the password, input the password need to set, press “OK”, confirm the password again, and press “OK”to confirm successful.Password support 8 digits.(If no need next step, then press “ESC”to back)
G 【Card】
Press▼ to【Card】

When the screen prompts punch card, punch card near the fingeprint scanner, then the card NO. wil be on the screen.Press “OK”to confirm successful, if the card was registered, machine will prompts card NO. repeat. (If no need next step, then press “ESC”to back).
H 【Privilege】
Press▼ to【Privilege】, then choose the users’ privilege. There are two privileges user and administrator,the machine defaults to normal users.When the machine have administrator, if want to enter menu need to identify administrator.
I 【Verify】
Default is F/P/C, it means one of the face/fingerprint/card/password verify way, and there are many other verify way, such as card+fingerprint, fingerprint+password, card+password, fingerprint+card+password, card+face.
1.2 Edit User
Step: Enter menu(Press“MENU”)→【Employee】→【View User】
Press▼ to the user need to edit, press “OK”, choose the user to edit, when finish.
press “ESC”back to menu
1.3 Delete User
Press menu→【Employee】→【Delete User】
Press▼ to “Machine No.”,input the ID need to delete, press“OK”,then press▼to “Delete”, press “OK”,after delete, press“ESC”back to menu.
2. Device Setting
Set device ID, time, communication setting, access setting, general setting,advance setting and record.
2.1 General Setting
Step:Press menu →【DevSet】→【General Setting】
A 【Machine No.】Set machine number(Defaul machine nnumber is “1”)
B 【Language】can choose Chinese or English
C 【Date format】Choose Year/month/date format.
D 【VoiceOut】Choose “Yes” or “NO”,if choose “NO”then there will no voice
E 【Volume】Control the voice prompt size, the max. is 8
F 【Auto Off】Set the automatically power off time, the max. setting is after 255 minutes to power off, choose “NO”is not set.
G 【Screen saver】Set screen saver time, the max. time is 255 minutes.
I 【Card format】Choose card digit, the default 8 digit card.
2.2 Advance Setting
Step:Press menu →【DevSet】→【Advance Setting】A【Delete All Rec】
Delete all the record in the device, once delete can not restore, please backup before operate.
B【Delete All Reg】
Delete all the user infromation in the device, once delete can not restore, please backup before operate.
C【Default Setting】
Make the device back to factory setting.
D【Upload Firmware】
Use Udisk to upload the newest firmware for the device.
2.3 Date and Time Setting
Step:Press menu →【DevSet】→【Date&Time】
Use ▲ and ▼key to set the right date and time.





 Giỏ hàng



-2272.jpg&w=278&h=300&zc=2&q=90)


